XenApp 7.6 – ThinPrint .Print Engine – Printer Issues – Windows can not connect to the printer 0x00000057

thinprint print enginePrinting has always brought some challenges to a virtual environment.  In my experience, printing issues have accounted for a substantial portion of the problems we have faced over the years with Citrix XenApp 5.0.

A stable printing environment in XenApp 5.0 was achieved by implementing a third party printing solution, Cortado’s ThinPrint .Print Engine 8.0.  Prior to that, the print spooler on Windows Server 2008 would crash unexpectedly several times a day on several servers in the XenApp farm.

Cortado’s ThinPrint .Print Engine 8.0 VLayer allowed us to virtualize all printers on our Windows Server 2008 Print Server.  Basically, .Print Engine 8.0 VLayer creates a (virtual) printer that carries over the settings from the original shared printer but utilizing the ThinPrint Output Gateway driver.  Thus, you end up with two printers on the Print Server.  One is the virtual ThinPrint printer with the TPOG driver and the other is the original printer that uses the native printer driver.  The VLayer printer becomes the shared printer and sends print jobs over to the original printer which then sends them over to the physical networked printer.  It solved many of our problems because, as many have noted, the majority of printer issues in Citrix XenApp are caused by printer drivers.  Our XenApp 5.0 servers no longer used the native drivers; instead, the TPOG driver is installed once on each of the XenApp servers.  Then, in XenApp Advanced Configuration Tool, you add the Print Server that hosts all VLayer shared printers.  Lastly, you create a Citrix Policy that assigns shared printers to Active Directory users as session printers.  The printers are created when a user logs in using the TPOG driver.

Upgrading to XenApp 7.6 from a XenApp 5.0 farm did not bring about as many headaches because of all the leg work done previously in planning and testing prior to deploying the product.  Once the XenApp 7.6 site was operational we encountered our first obstacle and unsurprisingly, the problem involved printing.

On our newly created XenApp 7.6 site we assign session printers to users via a Citrix Policy.  As done previously on the XenApp 5.0 farm, we installed the TPOG driver on the Virtual Delivery Agent servers.  Initially, session printers were auto creating without issue and users were able to print.  However, some of the printouts had partially garbled text.  It was assumed that it might be a corrupt font as this had happened previously in XenApp 5.0.  Replacing the suspected bad fonts ruled out that assumption.  Oddly, the problem was affecting applications that used previously created forms; typing up something new in Word, for example, did not reproduce the problem.

Reasoning that we were now on Server 2012 R2 and XenApp 7.6 as opposed to Server 2008 and XenApp 5.0, we asserted that perhaps we needed to update the ThinPrint .Print Engine to a newer version.  And we did.  And it worked.  The garbled text issue was gone and our users were able to print normally, at least for the remainder of the day.  It so happened that after updating ThinPrint .Print Engine from 8.0 to 9.0 we had to also update the TPOG driver on each of the XenApp servers.  Our XenApp 5.0 servers updated without problems but session printers on the XenApp 7.6 VDA servers stopped working the next day.  And despair set in.

man-674726_640The issue was possibly due to attempting to install the updated TPOG driver on the VDA servers.  We did so by connecting to the shared printer on the print server.  When that failed we tried installing it from the ThinPrint installation media. We stopped and restarted the print spooler a gazillion time over.

As I recall, the error in Server 2012 R2  running Citrix XenApp 7.6  was “Windows can not connect to the printer 0x00000057”.

Luckily, after some googleing around I found the following article that proved to be the right solution to the problem.

https://social.technet.microsoft.com/Forums/itmanagement/en-US/a225d71c-be8b-4530-bf50-63001559a978/windows-can-not-connect-to-the-printer-0x00000057?forum=itmanager

It’s actually the print driver failing to install, not the connection to the print server.  An initial attempt to install the driver failed, so the driver directory is present on the workstation, but missing the files.

1)  On a machine with the same driver installed (and working properly), open Regedit, and browse to:
HKLM\System\CurrentControlSet\Control\Print\Environments\Windows NT x86\Drivers\Version-3\
2)  Locate the subkey for the printer driver you are dealing with and click the key for the printer driver.
3)  Look for the “InfPath” on the right.  Note the path.
5)  Now browse to C:\Windows\System32\DriverStore\FileRepository and locate the folder indicated in the InfPath reg value.
6)  Go to the users computer exhibiting this behavior, and browse to C:\Windows\System32\DriverStore\FileRepository and see if the folder is present.  In my case, the folder was present, but empty.  If it is here and it is empty, you will have to modify security on the folder, first taking over ownership, then granting yourself full control.
7)  Once security is granted, copy the contents of this folder from a good machine to the machine presenting the 0x00000057.

Now try connecting to the print queue on the print server.  The driver should now download and install properly.

Good luck.  This isn’t the first time I’ve seen this happen, but this is the first time I decided a reimage was more than I wanted to take on, and I wanted to solve this so that I can correct it the next time it happens.  And I have yet to find a real solution to the 0x00000057 error code.

If memory serves me correctly, we were missing a file in that one folder, I think….perhaps the whole folder was missing…Okay!  To be honest, I just don’t remember as it happened a couple of months ago.  But I do know were were missing something from that folder as I wrote myself a note and it specifically reads “TPOG driver folder files missing” “ThinPrint Engine upgrade to 9.0”.  Give me a break, it was a very busy week and I keep getting old. 🙂


#print-engine, #citrix, #citrix-printing-issues, #cortado-thinprint, #publisheddesktop, #shared-desktop, #thinprint, #tpog-driver, #vda-7-6-0, #virtualization-2, #windows-can-not-connect-to-the-printer-0x00000057, #windows-server, #xenapp-7-6-2, #xenapp-7-6-printing-issues, #windowssystem32driverstorefilerepository

XenApp 5.0 to Xenapp 7.6 Upgrade / Migration Part 3

XenApp76-e1412349289803

This is a follow-up to the previous two posts for migrating to XenApp 7.6 from a XenApp 5.0 farm.

https://maaadit.wordpress.com/2015/09/10/xenapp-5-0-to-xenapp-7-6-upgrade-migration-part-1/

https://maaadit.wordpress.com/2015/09/11/xenapp-5-0-to-xenapp-7-6-upgrade-migration-part-2/

Installation and configuration of a new XenApp 7.6 site can go smoothly if we prepare for it.  The following XenApp 7.6 free training courses and videos are a good place to start; for those with prior Citrix experience, it may be enough for a successful deployment.

CXA-105 XenApp and XenDesktop 7.6 Foundations

http://training.citrix.com/mod/ctxcatalog/course.php?id=974

CXD-300eCW Deploying App and Desktop Solutions with Citrix XenApp and XenDesktop 7.6

http://training.citrix.com/mod/ctxcatalog/course.php?id=1102

XenDesktop Master Class: Live Install of XenDesktop/XenApp 7.6

wpid-wp-1441300745604.jpeg As with any other deployment, I find it useful to first make a diagram of the existing network/ server infrastructure to visualize what the current farm looks like.  I then conceptualize the server infrastructure for the new XenApp 7.6 Site by listing the various servers and how they will interact with other XenApp 7.6 servers/ components.  It is not something that you will be presenting at the next board meeting so don’t cringe your teeth just yet.  It’s merely an exercise to identify the various components and plan which servers will be allocated for which services in the new 7.6 site.

Using the same scenario from the previous two posts, our migration is well underway after the License Server component installation as discussed in Part 2.  Assuming the Domain Controller/s, File Server/s, and Print Server/s are already in production, we start by understanding what other infrastructure must be in place for a simple Xenapp 7.6 deployment.

The 7.6 Site will be composed of the following:

  • Delivery Controller

For those coming from XenApp 5.0, the Delivery Controller in XenApp 7.6 is sort of like the Data Store in a XenApp 5.0 Farm.  Citrix Director and Citrix Studio are installed along with the Delivery Controller.  Citrix Studio is where you can create, configure and manage your new site.  Citrix Director is a great tool for viewing all sorts of information and statistics regarding your XenApp 7.6 site and includes administrative tools such as shadowing users, logging off sessions, and placing VDA servers in Maintenance Mode to disable user logons.  It is recommended that the Delivery Controller be installed on a separate server; for high availability, it is also recommended to have more than one Delivery Controller.

  • SQL Express

SQL Express is the database that contains all the site’s data; it is created during the Delivery Controller installation.  If you already have an existing SQL database, you can point to that instead for backup and maintenance purposes.  In our scenario, the SQL Express database is created during the DC installation and resides on the same server.

  • License Server

The License Server component handles product licensing for XenApp 7.6.  Note that XenApp 7.6 no longer uses Terminal Server licensing; instead it uses Remote Desktop Services.  An important thing to keep in mind is that every VDA machine in the XenApp 7.6 site needs to point to the License Server.  You can achieve this through the VDA server’s Local Group Policy as explained here.

To set the correct license server and the mode it is operating in, we need to use a (local) group policy or change it directly in the registry.

The group policy setting the Remote Desktop licensing mode is located in:

Computer Configuration\Policies\Administrative Templates\Windows Components\Remote Desktop Services\Remote Desktop Session Host\Licensing

  • StoreFront

The Citrix StoreFront, for those coming from XenApp 5.0, is sort of like the Secure Access Gateway.  It is what the user connects to in order to access site resources such as applications and shared desktops.  It is recommended that you install two or more StoreFront servers for high availability.

  • XenApp Worker/s (Virtual Deliver Agent)

The Virtual Delivery Agent (VDA) is the XenApp 7.6 component installed on all servers that will be hosting applications and/or shared desktops.

Note that in order to run the XenApp 7.6 installer all servers on which the above listed components will be installed must already be added to the domain.  Prerequisite Windows Server Roles are installed automatically during the XenApp 7.6 installation with the exception of the License Server.  Prior to installing the License Server component, you must add the Remote Desktop Services Role – Remote Desktop Licensing.

The first XenApp component to be installed in our scenario is the License Server.  A not so robust server has been allocated for this purpose.  That same server will also house Citrix StoreFront as these are not generally resource intensive services for a small 300+ user organization.

Next up is installation of the Delivery Controller for which we allocate another server.  While a separate SQL server is recommended for larger deployments and to support mirrored backups, our small XYZ company wants to keep it simple.  Thus, SQL Express will be installed along with the Delivery Controller.

Lastly, XenApp 7.6 Virtual Delivery Agent is installed on each of the servers that will host shared desktops.  I find it helpful to have an application list I can use to make sure that all servers have the same applications installed.

XenApp 7.6 overall step by step installation instructions are included in the video above.  I found the video in Part 2 more useful when installing the License Server Component.

Once all required XenApp 7.6 services are installed we can move on to creating a new site.  As mentioned prior, we do this through Citrix Studio.  I like using the Full Operational Site option.  Since our deployment is quite simple and we are using physical servers, we select the No Machine Management option.

Next, we create our StoreFront. The following video details installation instructions for Citrix StoreFront.

In order to deliver applications and Server OS shared desktops to our users we will need to create a Machine Catalog and Delivery Group.  The Machine Catalog includes the VDA servers that will be hosting apps and desktops.  The Delivery Group is sort of like a group object where you add Active Directory users.  VDA servers are allocated to a Delivery Group from a Machine Catalog.

Lastly, we create Citrix policies for things such as Twain Redirection for scanner support and to add session printers.  Citrix User Profile Management is included in the VDA installation.  In our scenario, that was already in place through Group Policy.  Our XYZ company users are able to launch their shared desktops by using Citrix Receiver 4.3, 4.1 and also using the legacy PN Agent.

As always, it is useful to note the steps and options selected while creating and configuring your XenApp 7.6 site to easily back track or to use as a checklist for future installations and/or modifications.

#citrix, #citrix-receiver, #publisheddesktop, #storefront, #vda-7-6-0, #virtualization-2, #windows-server, #xenapp-7-6-2

Symantec Endpoint Protection (SEP) 12.1.5 Antivirus Exclusion – Windows Server 2012 R2 – Citrix XenApp 7.6

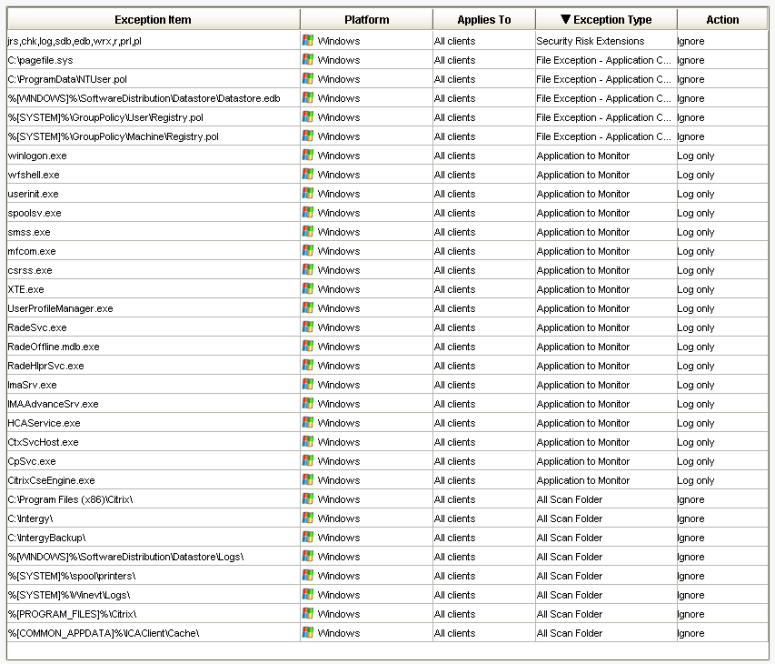
Antivirus exclusions are an important step in deploying server based technologies.  Organization’s performance needs are just as critical as security.  Antivirus protection on physical XenApp servers hosting applications and shared desktops can be a challenge when the appropriate exclusions are not set up because performance and availability can suffer drastically.  Some of the issues that can be avoided by exclusion include hanging user sessions, long delays at logon and logoff, long delays launching apps, server unresponsiveness, etc.

Looking at a deployment of XenApp 7.6 VDA on Windows Server 2012 R2 platform for a healthcare organization, the following resources were reviewed in identifying what to add to the exclusion policy in Symantec Endpoint Protection Manager.  The following links refer to best practices as recommended by Symantec, Citrix, Microsoft and in the case of a healthcare organization using Intergy, Sage.

(SEP) 12.1.5 Antivirus Exclusion – Windows Server 2012 R2 – Citrix XenApp 7.6

SEP_12.1.5_Exceptions

SEP_12.1.5_Exceptions

https://support.symantec.com/en_US/article.TECH91070.html

https://www.citrix.com/blogs/2013/09/22/citrix-consolidated-list-of-antivirus-exclusions/

https://support.citrix.com/article/CTX127030

http://social.technet.microsoft.com/wiki/contents/articles/18439.terminal-server-antivirus-exclusions.aspx

http://www.millennium-mb.com/files/Sage_Intergy_EHR_EMR_New_Jersey_York_Medical_Billing.pdf

Note that the registry fix described in the first link is performed after the SEP 12.1.5 client is installed on the XenApp 7.6 VDA server.

The fourth link down refers to Antivirus Exclusions recommended by Microsoft for Terminal Servers.  We were unable to find an updated list for Remote Desktop Services on Windows Server 2012 R2 but some of the previous exclusions will still apply.

The same is true for Intergy/ Intergy EHR exclusions.  Previous exclusions for earlier versions of Intergy still apply for newer versions.

Lastly, while all of the previous file exclusion recommendations come from the product vendors mentioned earlier, it is worth noting that some exclusions will technically make your server more vulnerable to attacks.  Thus, antivirus software on XenApp 7.6 VDA servers should only be part of a larger, more robust enterprise security plan.

#antivirus-2, #citrix, #exception-policy, #security-2, #sep-12-1-5, #sep-manager, #sepm, #shared-desktop, #symantec-endpoint-protection, #vda-7-6-0, #virtualization-2, #windows-server, #xenapp-7-6-2

XenApp 7.6 Slow Logon Performance – Hotfix ICATS760WX64009

On a XenApp 7.6 shared Server OS desktop, there is considerable lag when users are logging in.  During logon, sessions seem to hang for a good number of seconds on a black screen prior to being given access to the desktop.

A simple way of improving slow logon performance on XenApp 7.6 shared desktop is to install Hotfix ICATS760WX64009.  This diminishes Interactive Session time by a few seconds.

Hotfix ICATS760WX64009 is not guaranteed to absolutely cure a slow logon but does help if you are on XenApp 7.6 and your VDA servers are running VDA Version 7.6.0.  The hotfix linked herein applies only to XenApp 7.6; XenDesktop 7.6 VDA Core Services for Windows Server OS (64-bit).

Hotfix ICATS760WX64009

If you want to further improve logon performance in XenApp 7.6 and not afraid to get dirty look into doing some of what this fellow Citrix Admin posted:

A few people have had problems here and I’ve ran into similar issues in the past few environments setup using 7.1, 7.5, and 7.6. I never faced these problems in XenApp 6.5. Since this is like my third go-round with this and using fully patched (7.6.1) with this build thought I’d post my workings.

Initial logon time with Citrix Policies, Group Policies, Logon Scripts: 280 s

Disable Antivirus: down to 40 s

Create Low-Risk policy, disable read/write scans of low-risk, add userprofilemanager.exe to low risk, re-enable antivirus: up to 67 s

Made exclusion to UPM Logs on top of regular citrix recommendations: down 45 s and also cleared mclogevent errors for long logon/logoff

Enabled legacy graphics mode: down 37 s

Disable Profile Streaming (fresh build, fresh roaming profiles, and highly configured exclusion list for appdata): 31 s

Delete key {2c7339cf-2b09-4501-b3f3-f3508c9228ed} from HKCU\software\Microsoft\active setup\installed components during logon which got time down to: 26 s ****This item drastically improved my RDP logins to the server****

Found errors in group policy processing, fixed issues causing errors so no more group policy warnings: 21 s

Full uninstall of receiver 4.0 and cleanup of registry/files per citrix article, reboot, install of 4.2: times down to 20 s for logon (before responsive desktop). ****This item also fixed my issues with COM1 port mapping for MICR printing in testing****

So, Citrix protocol is getting me into the server in about 20 seconds now and RDP protocol is getting me into the server in about 30 seconds. Don’t think I can ask for much more. Thanks for everyone’s findings and posts.

David

#citrix, #hotfix-icats760wx64009, #interactive-session, #publisheddesktop, #shared-desktop, #vda-7-6-0, #virtualization-2, #windows-server, #xenapp-7-6-2

Xenapp 5.0 to Xenapp 7.6 Upgrade / Migration Part 2

This is a follow-up to Xenapp 5.0 to Xenapp 7.6 Upgrade / Migration Part 1.

In the scenario explained in Part 1, we already have a functioning XenApp 5.0 Farm and are moving to XenApp 7.6.  The XenApp 5.0 Farm already has a License Server.  The old License Server in the Farm will not be able to service the new XenApp 7.6 Site because it is an older version.

There are two options when upgrading from Xenapp 5.0 to Xenapp 7.6 in regards to licensing.

  1. You can install a brand new License Server
  2. You can upgrade the old License Server

The second option will not be recommended for our scenario since our Xenapp 5.0 License Server is installed on a XenApp server that is also delivering published desktops to users.  Additionally, it is running on Server 2008 and we want our entire Citrix XenApp 7.6 site to be on Server 2012.  It is possible to upgrade the old License server and leave it on the Server 2008 platform and uninstall all other XenApp 5.0 components but we would like a fresh new install 🙂

Installing a new License Server will not invalidate your old 5.0 Farm License Server so breath easy.  What’s more, the newer License Server version installed with XenApp 7.6 is backwards compatible, meaning that you can point both your Xenapp 7.6 Site and your old Xenapp 5.0 Farm to the same License Server; this is what is recommended as to not infringe on the license agreement.

Once you know which server will be the License Server, you can go to your Citrix account to activate and allocate or reallocate your licenses to the new server using the server host name.  After doing so, the files needing to be imported to the new License Server will be available for download.  All the while, your old License Server is functioning as normal.

You will now have to install the License Server component on the server to which you have allocated the license files.  One thing to keep in mind is that you must install Remote Desktop Services through the Add Server Roles and Features prior to installing the License Server.  Citrix has done an awesome job of adding server roles and features for you during the installation of all other XenApp 7.6 components with the exception of the License Server.  The following video shows how to install Xenapp 7.6 License Server step by step.

After installing the License Server from the XenApp 7.6 installation disc you will need to import license files (downloaded previously from Citrix) through the License Administration Console and select Overwrite License File on License Server.  The LAC login will be the Domain Admin credentials.  After importing, clicking on Reread License Files should make them show up in Dashboard.  For detailed instructions you can Google How to Add Allocated Licenses to the License Administration Console.  The official Citrix support article will walk you through it step by step.

#citrix, #citrix-receiver, #publisheddesktop, #shared-desktop, #storefront, #vda-7-6-0, #virtualization-2, #windows-server, #xenapp-7-6-2